Showing posts with label Crafting. Show all posts

Sunday, December 12, 2010

Cake Pops

While we are under a record breaking snow fall for December.  43.2 inches between Sunday and Wednesday to be precise according to the National Weather Service.  I've been busy getting ready for the  holiday season.  There's nothing I love more than to make gifts for friends and loved one. 

So I thought I would highlight a gift I am making for friends...only if you can keep it a secret.

I have been wanting to make cake pops.  What are cake pops you might ask...they are cake bites on a stick, dipped in rich candy coating.  I purchased the Cake Pops cookbook by Angie Dudley a.k.a. Bakerella from our local bookstore.  Check out her wonderful website for recipes and ideas on how to make cake pops, cake balls, cupcake bites and other bite size treats.
http://www.bakerella.com/category/pops-bites/cake-pops/
or
http://www.youtube.com/watch?v=JpIifr0VOxY

I know the whole idea of dipping a piece of cake in candying coating sounds easy.  I found not so much!
So here are some tips:
These yummy treats are made from a crumbled 13x9 inch spice cake and 3/4 of a container of cream cheese frosting mixed together.

 Roll the dough in 1 1/2 inch balls and freeze for 15 minutes. 

 It makes 4 dozen balls.

Next, dip 1/2 inch of the tip of a lollipop sticks in melted candy coating, and then insert the lollipop stick straight into a cake ball, pushing it no more than halfway through.  Make sure you stick it in far enough in the balls or they will fall off in the middle of deeping the balls in candy coating.

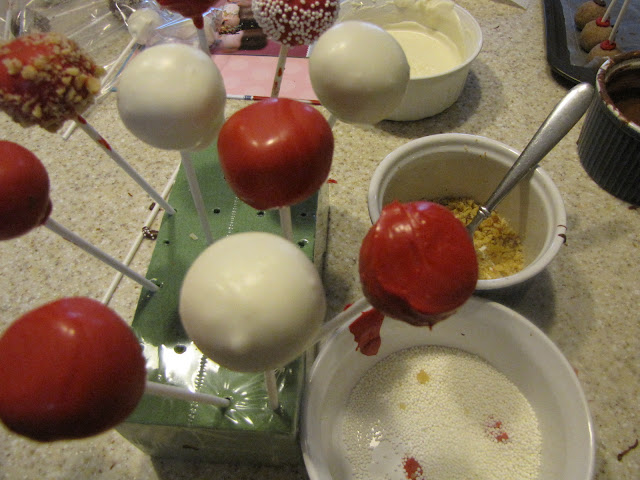
Ok this picture is of the balls already dipped in candy coating.  I was so busy melting candy, taking balls out of the freezer, juggling balls, and trying to not drop them I didn't have time to take a picture. The idea is to dip the entire cake ball into the melted candy coating until it is completely covered, and remove it in one motion.  I found you have to tap and rotate them to get the excess coating off the ball.  And it was best to take balls out of the freezer a few at a time.  So I could dip them before they reached room temperature.  They harden fast so if you plan on treating them with springles...be ready. When most of the excess coating falls off and no longer dipping, stick the cake pop into a styrofoam block.   

I covered them with a small treat bags and ribbon.

 And arrangement them in a container. 

Three gifts done...

Tuesday, July 20, 2010

Crafting with lavender

Creating Your Own Lavender Sachet!

To create your own sachet, rub the heads of dried bundles between your hands, collecting the blossoms on a clean surface. Sift the brown flower bracts out of the mixture leaving only the purple fragrant buds. Depending on the variety, some lavender falls off the stem soon after it is dried (eg: Sachet, Provence, Dark Supreme) and others stay on the stem better and are good to use for dried bouquets (eg: Royal Velvet, Grosso, Hidcote Giant, Glos Bleu).


Making a Lavender Wand

Materials: 13 or more fresh stems of lavender (we recommend Grosso), (any odd number greater than 13) each at least 12 inches tall.2 yards of satin or other ribbon, 1/4 inches wide. Patience... allow yourself about 40 minutes to do your first wand. Be very forgiving of yourself... like all skills, this one improves with practice.

1. Harvest the lavender early in the day, and make sure that the flowers are not damp. Strip all the leaves from the stem.

2. Line up the bottom of the flower heads and tie them gently together with the end of the 2 yards of ribbon. See picture 1.

3. Turn the bundle upside down and gently bend each stem down around the blossom heads. You can facilitate this step by scoring the underside of the stem section that is being bent with your fingernail. When all of the blossoms are "in a cage of stems" the long end of the ribbon should be pulled out of the cage, the short end tucked inside.

4. Line up all of the stems evenly around the blossoms, making sure that they do not overlap. See picture 2.

5. Start to weave the ribbon under and over the stems. Gently pull on the ribbon to make sure the weave is tight. The most difficult part of this process is in the first two rows of the weaving. On the second row you should be going under the stems that you had gone over on the first row. See picture 3.

6. Continue weaving until you have covered all the flowers. You can use a toothpick to push any buds that stick out back into the weave or rub them off. Wrap the ribbon around the "neck" of the wand and tie a slip knot.

7. Trim the stems to the same length and continue to wrap the stems until you reach the end and glue the ends. Tie a bow around the neck of the stems.


Tuesday, March 16, 2010

Do you want to look like a clown or a beauty?


Thank heaven for little girls!

I have been thinking alot about my little girl lately. Remembering her playing dressup with my Mom. Decked out in makeup and alot of jewelry she would always ask her grandmother if she wanted to be a clown or beauty. And the outcome being the same regardless of what choice my Mom made. That little girl is now 30 and I can still see the red lipstick smeared on her lips with so many beads you didn't know where the jewelry started. So with thoughts of her I am introducing a necklace with little girls in mind.

Remembering my Little Meemer!

Soon to be on sale at Etsy.com
Related Posts with Thumbnails

Explore Skaneateles